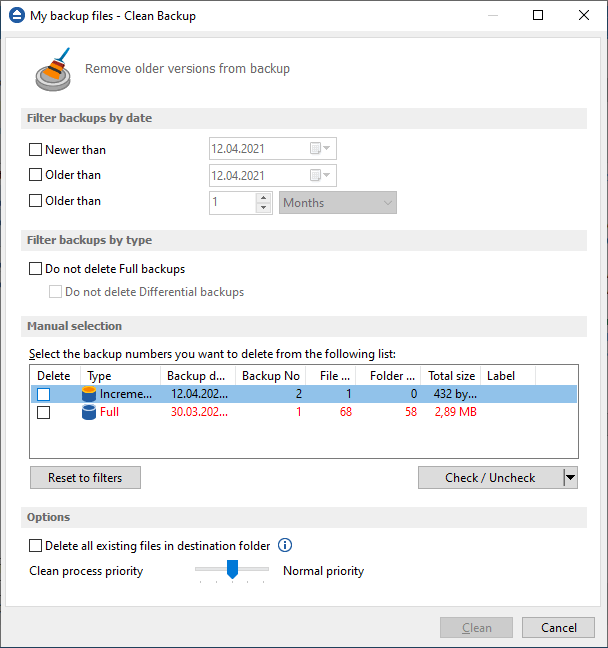
The Clean backup window can be opened from the Jobs tab by pressing the Clean button. It gives options to delete backup numbers based on certain criteria.

When you open the window all the backup numbers are displayed. You can either manually check multiple backup numbers you want deleted or use the filter options to have them automatically selected if they match a certain criteria. Once you select a type of backup, if there are other backup numbers depending on it, they will be selected too. For instance, selecting a Full Backup (marked with red in the list) will also batch select the other incremental or differential backup numbers that depend on the selected full backup (to keep some of the backup numbers that depends on the full backup, you will have to start unselecting them in the order they were created).
Please note that when you delete a certain backup number using the Clean Backup tool, all the files in the destination that were created for that backup number will be removed.
There are several columns in the Clean Backup window that provide information for each backup number:
- Delete - Shows if a backup number is selected for deletion. You can manually check/uncheck the backup numbers you want deleted. Once selecting a backup number all the other backup numbers that depend on it will also be selected.
- Type - Type of the backup. Each of the backup types is represented by a descriptive icon and text:
![1.full_16 1.full_16]()
![3.incremental_16 3.incremental_16]()
![2.differential_16 2.differential_16]()
![4.mirror_16 4.mirror_16]()
- Backup No. - Number of the backup
- Backup date - Date and time when the backup was executed
- File No. - Number of files included in that backup
- Folder No. - Number of folders included in that backup
- Total size - Size of the backup
- Label - Label of the backup increment.
The backup numbers in the list can be sorted by clicking on the column headers. The right-click menu on the column header provides a handy way to show/hide unnecessary columns.
You can select a backup number by right-clicking it and choosing Check Selected (or uncheck it using Uncheck Selected ). The right-click menu also allows selecting all backup numbers (Check all ) or unselecting them (Uncheck all ).
Using the Priority slider you can set the execution speed compared to the rest of the running processes on your computer. Default is Normal priority, but there are other 4 priority levels: Lowest priority, Low priority, High priority and Highest priority. On Lowest priority the process will consume the minimum amount of computer resources but will take the longer to complete, while Highest priority will consume the highest amount of computer resources but will take the least to complete.
Filter backups by date
Newer than
If checked backup numbers that are newer than the selected date will be removed when the Clean operation is executed.
Older than
If checked backup numbers that are older than the selected date will be removed when the Clean operation is executed.
Older than (fixed date)
The backup numbers that are Older than a certain fixed date will be deleted when the Clean operation is executed.
Filter backups by type
Do not delete Full backups
If this is checked, the full backups will be kept even if they fall into the range of files filtered for deletion.
Do not delete Differential backups
If this is checked, the differential backups will be kept even if they fall into the range of files filtered for deletion. Note that this option is available only when Do not delete full backups is checked, because differential backups depend on full backups.
Manual selection
In this section you can manually select the backup versions you want to delete by clicking the checkbox in front of the backup version.
Reset to filters
Pressing this will ignore any manual selection done and restore the default selection based on the filters applied.
Options
Clean the destination folder
Selecting this option will also delete from the destination folder all the files and folders which are not related to the backup job. This action will be executed in addition with the cleanup selection you made.
Clean process priority
Using the Priority slider you can set the test execution speed compared to the rest of the running processes on your computer. Default is Normal priority, but there are other 4 priority levels: Lowest priority, Low priority, High priority and Highest priority. On Lowest priority the test process will consume the minimum amount of computer resources but will take the longer to complete, while Highest priority will consume the highest amount of computer resources but will take the least to complete.


