File filtering in Backup4all provides an intuitive way to define what files and folders to back up or restore. By default, the filters are defined as include filters. If no filters are defined, then all the files and folders from the sources will be backed up or restored.
On this page:
Filters overview
The files can be filtered when added to backup. On the What do you want to backup page, from the Backup Wizard or Backup Properties -> Sources page each file and folder is shown in the tree with a checkbox in front of it. If you uncheck it, the file or folder will be excluded from the backup or restore process.
After applying filters, each file and folder is shown in the tree with a checkbox in front of it. If you uncheck it, the file or folder will be excluded from the backup or restore process.
The role of the filter is to restrict the files from the sources or destination that will participate in the backup or restore process. The filter actually consists of two filters: the include filter and the exclude filter.
Include filter shows which files will be included in the backup or restore process.
Exclude filter shows the files that will be excluded from the backup or restore. You can see the kind of filter in the Type column.
By default, the filters are defined as include filters. If no filters are defined, then all the files and folders from the sources will be backed up or restored. To change a filter type from include to exclude or from exclude to include, just press the Change to Exclude/Change to Include button.
Customize filters
There are special situations when the main filter is not enough to define the files to be backed up or restored. In this case, you can refine the filters adding individual filters for folders. The refined filter applies to all the files and subfolders of that folder. All files and folders for which a refined filter is applied are marked with red.
To remove a refined filter, select the folder, select the filter and press the Delete button.
File Filter
The Edit file filter item window is shown every time a file filter restriction is added or modified. It can be opened by pressing the Add button from the Filters page (New Backup Wizard, Backup Properties, Restore Wizard window or File -> Options) or the Edit button (if filters are already defined).


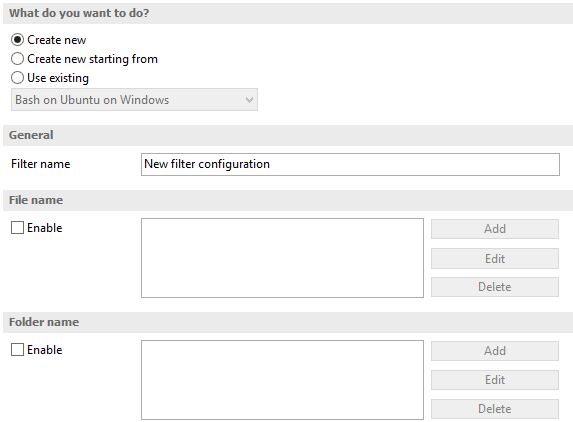
What do you want to do?
User can use the following options: Create new filter, Create new starting from existing filter or Use existing filter. The existing filters are listed in the drop down list and they can be added, edit or deleted from File -> Options -> Filters
General
In the Filter name field you can type the name of the created filter. By default, the "New filter configuration" name is assigned. If you use an existing filter, the name of that filter is used.
File name
Enabling this will allow defining filters based on file name pattern.
Press Add and select an existing file extension from the Filter combo (*.doc, *.pdf, *.zip etc.). If the extension does not exist in the combo, just type it in and press OK. You can use the Edit or Delete buttons to modify/remove the file name filters defined.
File name patterns can include:
- * - it matches one or more letters. For example a*.doc matches all files that start with a and have .doc extension
- ? - it matches only one letter. For example a*.do? matches all files that start with a and have any extension composed of three letters, the first two being do
Folder name
Enabling this will allow defining filters based on folder name pattern.
Enter the directory name that you want to filter in the following format: *\directoryname\* (leading *\ and ending \* are required). Backup4all will apply the filter to all the directories that are called directoryname. If you want to apply the filter to directories containing a specific word, you must enter it in the following format *\*keyword*\*. Now Backup4all will apply the filter to all the directories that have the word keyword in their names. You can use the Edit or Delete buttons to modify/remove the folder name filters defined.
You can also use environment variables when creating filters: %temp%, %SystemRoot% etc.
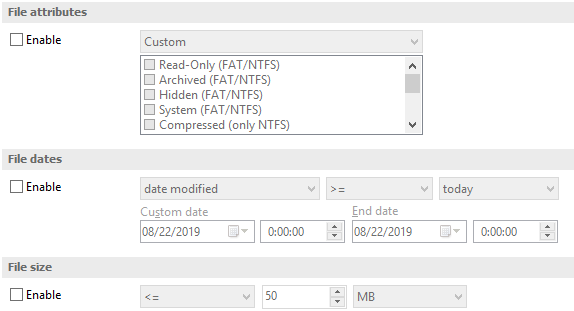
File attributes
Enabling this section allows the user to specify file filters depending on the file attributes.
There is a list of quick sets to choose for predefined filter criteria:
- Custom - this is the default option and allows you to check whatever attributes you want
- None - if this is selected all the file attributes check boxes are unchecked
- FAT attributes - if this is selected, a set of File Allocation Table attributes will be used for file filtering.
- NTFS attributes - if this is selected, a set of NTFS (New Technology File System) attributes will be used for filtering. Note that these attributes are available only on Windows 10/8.1/8,7/Vista, Windows XP, Windows Server 2003.
File attributes available for file filters:
- Read-Only - if checked files with read-only attribute will be selected
- Archived - if checked files with archived attribute will be selected
- Hidden - if checked files with hidden attribute will be selected
- System - if checked files with system attribute will be selected
- Compressed (only NTFS) - if checked files with compressed attribute will be selected
- Temporary (only NTFS) - if checked files with temporary attribute will be selected
- Encrypted (only NTFS) - if checked files with encrypted attribute will be selected
- Not indexed (only NTFS) - if checked files with "not indexed" attribute will be selected
- Offline (only NTFS) - if checked files with offline attribute will be selected
- Reparse point (only NTFS) - if checked files with reparse point attribute will be selected
- Sparse file (only NTFS) - if checked files with sparse file attribute will be selected
For example, if you want to include files with read-only and archived attributes set, you have to check both attributes checkboxes in a single restriction. If you want to include files with read-only or archived attributes set, you have to make two separate restrictions: one for read-only and another for archived.
File dates
This section allows the user to build restrictions based on file dates and times. To enable options in this section, check the Filter by date option.
Filters in this section can be applied by selecting one of the available date filters:
- date accessed
- date and time accessed
- date modified
- date and time modified
- date created
- date and time created
You can compare these dates and times with a fixed date or a relative date: today, yesterday, one week ago or one month ago.
Comparison operators available:
- <> date (and time) not equal to fixed or relative date
- <= date (and time) less than or equal to fixed or relative date
- \>= date (and time) greater than or equal to fixed or relative date
- < date (and time) less than fixed or relative date
- \> date (and time) greater than fixed or relative date
- in interval - date (and time) in a particular time interval between the Start date and End date
File size
This section provides the possibility to build restrictions based on the file size. To enable the options in this section, check the Filter by size option. You can enter a file size in the Size field and select a measurement Unit. The filter will compare the file size on disk with the size you enter using the comparison filters you selected:
- <> file size on disk not equal to the value in the Size field
- <= file size on disk less than or equal to the value in the Size field
- \>= file size on disk greater than or equal to the value in the Size field
- < file size on disk less than the value in the Size field
- \> file size on disk greater than the value in the Size field
Note:
Filters on files and filters on folders must be created individually. If you use a file and a folder filter condition in the same filter, files will be filtered only if both filter conditions were met.
Examples
- If you use a single filter for .jpg files and Temp folder, only the .jpg files from Temp folder will be filtered. If you use separate filters for files and folders, all .jpg files and whole Temp folder will be filtered.
- Suppose you want to backup (or restore) all .pdf files accessed in the last month and all .doc files modified in the last week, but you don't want to backup (or restore) system or hidden files.
Here are the steps to define this filter starting from the default filter:
- Add a new restriction in the include filter: enable File name, add *.pdf file pattern and set date accessed to be greater than or equal to fixed date one month ago; click OK
- Add a new restriction: add *.doc file pattern and set date and time modified to be greater than or equal to fixed date one week ago; click OK
- Add a new restriction: enable File attributes and the System checkbox, then click OK
- Add a new restriction: enable File attributes and the Hidden checkbox, then click OK
- For the last two restrictions, press the Change to Exclude button.


