This article will show you how to create a new backup job using Backup4all. The backup sources can be located in various places and the backup destination be a local hard drive, a network place, FTP server or SFTP server.
To create a new backup job, follow these steps:
1) Open Backup4all
2) Go to File menu -> New backup
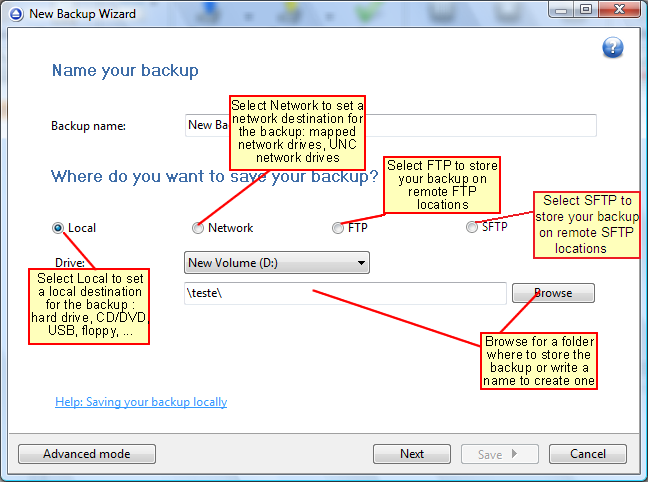
3) Enter the name of the backup job. This name will appear in the backup list, right under the chosen picture. This field is mandatory.
The name of the backup job is closely related to the name of the subdirectory in destination that contains zipped and mirrored files and to the name of the catalog. That is why when you rename the backup job, the name of the catalog and the name of the subdirectory from destination are also changed if possible.
If the destination is on HDD (local), LAN (network) FTP or SFTP (remote) the name of the subdirectory and the name of the catalog can be changed, except for the case when you do not have enough permission to rename or some files are locked.
If the destination is on a removable disk CD, DVD or Blu-ray disc, floppy disc and you have run the backup job, the catalog and the subdirectory in destination are already created and they will not be changed. If the backup job has not been run yet, then the catalog and the subdirectory will be created with a name similar to the backup job at first backup run. In the Where do you want to save your backup section, user can select one of the available destinations:
- Local: hard disk drive, floppy drive, zip drive, CD/DVD/Blu-ray drive, USB drive, mapped network drive
- Network: UNC network drive
- FTP: remote FTP locations
- SFTP: remote SFTP locations

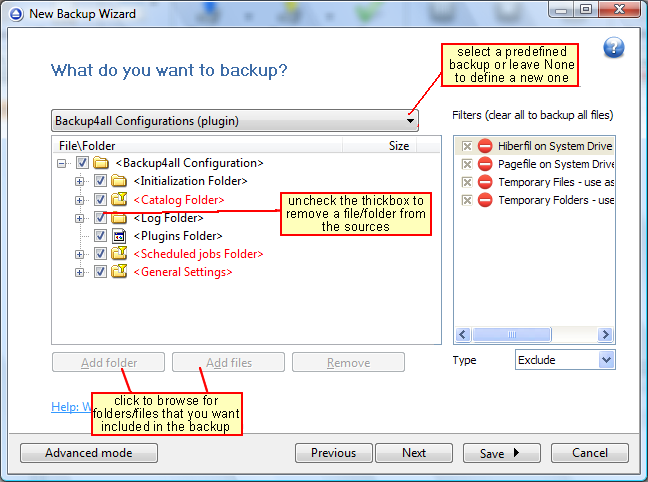
4) Select the sources for your backup. You can manually add your own files and folders by pressing the Add files and Add folder buttons or you can use the predefined backup sources from the list. If you switch to Advanced mode, you can also add files and folders easily with drag and drop them in the sources list.
During backup, if the source drive is missing (when the network is disconnected for instance or CD/DVD/Blu-ray is missing), a warning message is shown containing the list of missing drives. The user can choose Abort to stop the backup process, Retry to check the drive again, Ignore to mark the source folder as deleted and continue with the next sources. If the backup is started by the scheduler, then the system will try to access the sources for as many times as set in the Tools -> Options -> Backup window. When all retries are done with no success, the backup will abort.
If you have filters defined in Tools -> Options -> Filters, they will be listed in the Filters list. You can use this filters to customize the backup sources selection. All filters listed are include filters. Do not select any filter if you want to backup all files.
Filters list
In the right side of the New Backup Wizard window there is the Filters list. You can use these filters to customize the file selection.
The filters are defined in Tools -> Options -> Filters. Only the filters that have "Show filter in New Backup Wizard" option set are shown. Filters can be of type include (backup files that match the filter) or exclude (do not backup files that match the filter).
By default, the list contains filters to exclude temporary and system files/folders such as: hiberfil.sys, pagefile.sys, System Volume Information, Temp, etc. If you don't want to use a filter from that list, simply clear (un-check) it. Clear all filters if you want to backup all files.
Tips:
- you must add at least one file or directory in order to continue with the next step of the wizard.
- try to keep the number of checked files and folders greater than the number of unchecked files and folders - backup process will run faster this way.
- you can add files/folders to the Sources window by dragging and dropping them from Windows Explorer Please note you cannot add or remove source files from a backup job created with a backup plugin. In such a case, you can only uncheck the files and folders you don't want to backup.

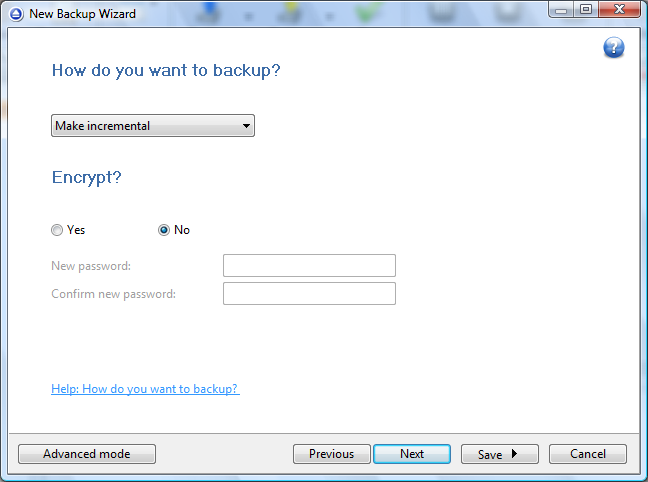
5) In How do you want to backup section, select the backup type to be used: Full, Differential, Incremental or Mirror. The Full, Differential and Incremental types will create zipped backups while the Mirror type will create in destination an exact copy of the source files without zipping them.
- Make full: full backup is the starting point for all other backups and contains all the data in the folders and files that are selected to be backed up. Because full backup stores all files and folders, frequent full backups result in faster and simpler restore operations. Remember that when you choose other backup types, restore jobs may take longer.
- Make differential: a differential backup contains all files that have changed since the last full backup. The advantage of a differential backup is that it shortens restore time compared to an incremental backup. However, if you perform the differential backup too many times, the size of the differential backup might grow to be larger than the baseline full backup.
- Make incremental: an incremental backup stores all files that have changed since the last full, differential or incremental backup. The advantage of an incremental backup is that it takes the least time to complete. However, during a restore operation, each incremental backup must be processed, which could result in a lengthy restore job.
- Make mirror: a mirror backup is identical to a full backup, with the exception that the files are not compressed in zip files and they cannot be protected with a password. A mirror backup is most frequently used to create an exact copy of the backup data. It has the benefit that the backup files can also be readily accessed using tools like Windows Explorer.
If you choose the Make mirror option, you can also check the Compress option to zip each file individually, preserving the folder structure. This allows you to use the zip compression and encryption features.
Encrypt
In the Encrypt section you can add zip protection to your backups.
Type the password you want to use for this backup.
The default encryption used is Advanced Encryption Standard (AES), the best choice in zip protection, but recognized only by the latest version of third party zip applications. The default size of the encryption key is 128 bits. If you want to configure more encryption settings or choose a stronger encryption key, press the Advanced mode button.

6) Indicate when do you want the backup to start scheduled. You can choose between Manually, Daily, Weekly, Monthly or Shutdown. Switching to Advanced mode you can configure more options for the scheduled task.
How often? From the drop-down list, you can select one of the available option:
- Manually - the backup job will be started manually by the user
- Daily - the backup job will be started daily at its scheduled time
- Weekly - the backup job will be started weekly at its scheduled time
- Monthly - the backup job will be started monthly at its scheduled time
- Shutdown - the backup job will be started at the computer shutdown
By default, the selected option is Manually.
What day?
This field is activated only when the Weekly or Monthly option is selected in the How often list.
If the Weekly option is selected, you can choose the day of the week when to run the backup.
If the Monthly option is selected, you can choose the day number of the month when to run the backup.
What hour?
From this field, you can select the hour for the backup job to start.
User
In this field, by default, the current logged in user's login name will be displayed.
Password
If your user account has a password make sure that you enter it by pressing the Set password button. We do not save your password but it is needed in order to set up the scheduled task in the Windows Task Scheduler. If your user account does not have a password you must select the Allow blank passwords when scheduling option from Tools -> Options -> Preferences. Also, make sure that you enter the correct password - if the password is wrong the scheduled task will not run.
7) Press Save or Save and run to start the backup execution and also saving the backup job you created.


