Backup4all supports backing up to HiDrive. This cloud storage location is known to offer adequate storage space for regular use.
Defining a HiDrive configuration

Before using HiDrive as a destination for backing up, you should define a new HiDrive configuration in File->Options->Online connections->HiDrive page. Once defined, you will be able to apply this HiDrive configuration to individual backup jobs.
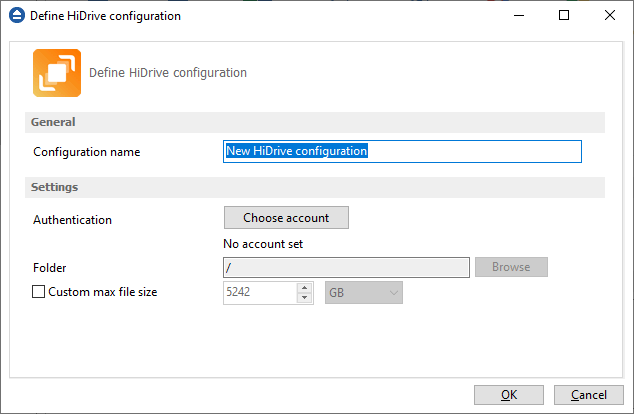
Press the Add button once in File->Options->Online connections->HiDrive to add a new HiDrive connection. After you press Add button, the New HiDrive configuration name will appear in the list and you can enter the other settings for this connection:
- Configuration name - Set the name of your choice for the connection.
- Authentication - pressing the "Choose account" button will open an authentication page in your default Browser application. Log into HiDrive to allow Backup4all access to the account.
- Folder - If you want to use a specific folder, press the Browse button to select the folder or to create a new one.
- Custom max file size - this option allows you to set a custom file size (by default is 2 GB). It is useful if you don't want large files to be split on upload.
In the Online connections page you can set the number of retry attempts and interval length (wait) for connecting to HiDrive. This is a global setting for all HiDrive connections. By default, if the server cannot be reached the first time, Backup4all will attempt to connect 5 more times at intervals of 60 seconds. If all attempts fail, then the backup is aborted.
Once you have finished defining the connection, press the Test button to check if the HiDrive details you have entered are correct. If the test was successful, The HiDrive connection was tested successfully message will be displayed.
Setting the destination to HiDrive
When defining a new backup job using the New Backup Wizard, select HiDrive in the Destination section (1st page of the wizard). If you already have a defined backup job and want to change the destination to HiDrive, select that backup job, open the Properties window (Ctrl+P), go to the Destination page and select HiDrive. There you can choose from existing HiDrive configurations or create a new connection.
If you have any defined HiDrive configurations, you will be able select one from the dropdown list (to define a configuration go to File->Options->Online connections->HiDrive ). Alternatively, you may define a custom configuration during the same step of the Backup Wizard.
Once you've entered the connection details, it is recommended to run a connection test by pressing the Test button.
Recommendations for backing up to HiDrive
- After each change to the HiDrive configuration be sure to use the Test function.
- If you backup important data to a remote location using HiDrive, encrypt the zip files for increased security. In this case, even if another person manages to gain unauthorized access to your HiDrive account, your files will still be protected.


