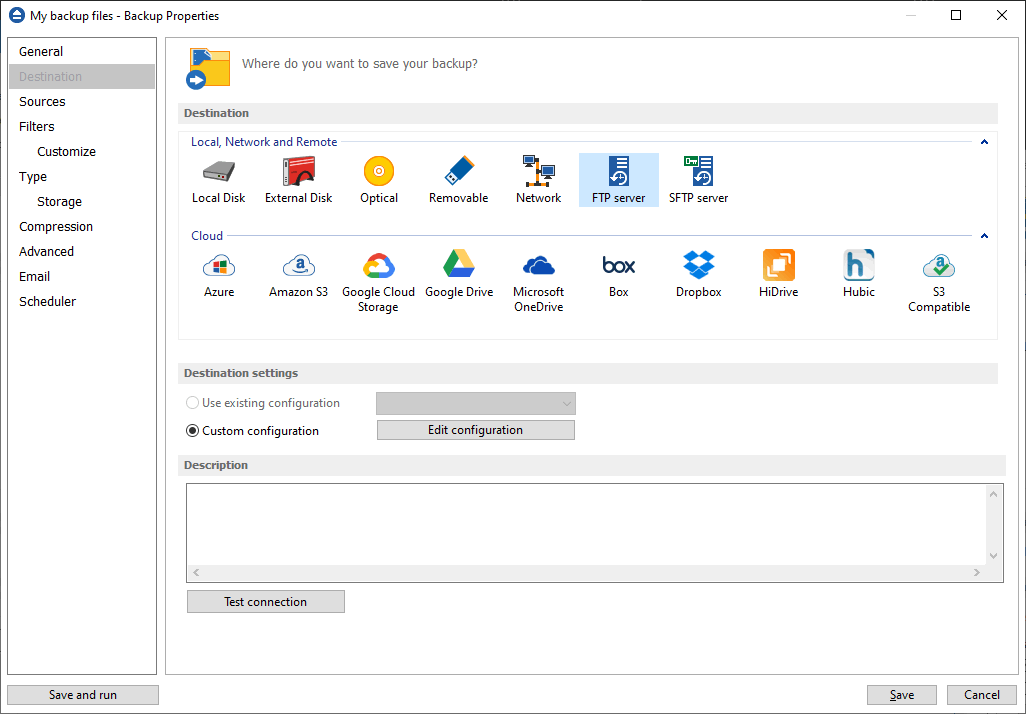
Backup4all supports backing up to a remote computer or device using FTP (File Transfer Protocol) connection. This is a practical backup destination because the backed up data can be easily accessed from any other computer with an Internet connection.

Destination settings
Use existing configuration
Use this option if you want to use an already defined FTP location in File->Options->Online connections->FTP. From the drop-down list, select the FTP location you want to use.
The advantage is that if you use the same FTP destination for multiple backup jobs and a modification is needed for destination, you can change only the FTP configuration from File->Options->Online connections->FTP and all backup jobs destinations will be updated.
Custom configuration
Use this option to add a new FTP location or to edit an existing one by pressing the Edit configuration button.
Description
Here you can see a listing of the FTP settings.
If you configured a new FTP location or you edit an existing one, you should use the Test connection button to see if the FTP settings are correct. If the test was successful, The FTP connection was tested successfully message will be displayed.
Once you press the OK button, Backup4all will try to connect to the FTP server to see if a backup catalog already exists on the destination. If the FTP destination is not available, a Cannot connect to the FTP server message is displayed in the status bar (bottom of the main window).
FTP Configuration
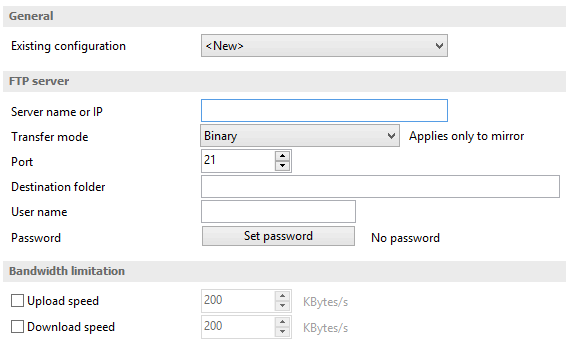
This window is shown when selecting Edit configuration from the Destination->FTP window.


General
Existing configuration
If you want to add a new FTP location, the <New> option should be selected. To edit an existing FTP location, select it from the drop-down list. All fields will be filled with the values of the selected FTP.
FTP server
- Server name or IP - In this field you have to enter the name or IP address for the FTP server
- Transfer mode - Here you can select the transfer mode: Binary, ASCII or Auto.
- Binary: it refers to transferring files as a binary stream of data. The binary mode transmits the raw bytes of the file being transferred. In this way, the file is transferred in its exact original form.
- ASCII: it stands for American Standard Code for Information Interchange, and is a type of character encoding based on the English language used on devices that handle information stored in text. It includes 33 non-printed control characters and 94 printed characters such as letters and punctuation.
- Auto: according to the list of ASCII files defined in File->Options->FTP, the files will be uploaded in ascii or binary mode, depending on their extension.
By default, binary mode is selected and it applies only to Mirror backup type. That is useful if you have a Linux FTP server as backup destination and want to download the backed up files with another application which uses the Auto transfer mode. Uploading the files to a Linux server in binary mode and downloading them in Auto mode, causes the files to be modified by adding a new empty line at the end of each file.
- Port - In this field you have to enter the port number if different than the default FTP ports (21).
- Destination folder - Here you can enter the destination path if different than root.
- User name - If this is a private FTP server (no anonymous access allowed) enter the user name for your account.
- Password - In this field enter the password for the FTP server.
Bandwidth limitation
In this section you can set different limitations for upload/download speed:
- Upload speed - if checked you can set a maximum upload speed for the FTP transfer
- Download speed - if checked you can set a maximum upload speed for the FTP transfer
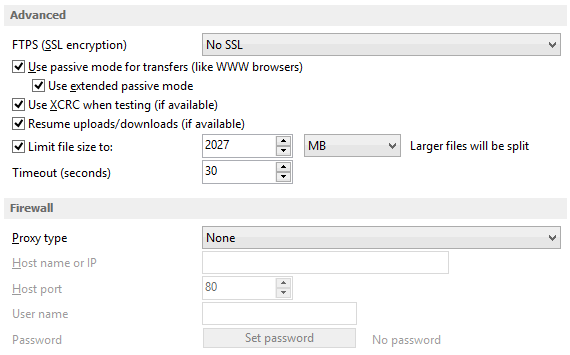
Advanced
FTPS (SSL encryption) - indicates the level of Transport Layer Security (TLS) required for control channel and data channel connections to the FTP server:
- No SSL - the server does not require Secure Socket Layer transport
- Implicit SSL - implies that Secure Socket Layer is in use
- Only explicit SSL - allows the connection to the FTP server only if TLS is available.
- Explicit SSL, if available - when SSL is available, uses explicit security by default. The server allows regular FTP sessions without encryption as well as encrypted FTP sessions using SSL.
Use passive mode for transfers (like WWW browsers) - each file transfer (upload or download) needs an additional connection for the data stream. Normally (in active mode), the server establishes this connection. In passive mode, however, the client establishes the connection. This may be necessary through some firewalls, which do not allow connections from outside.
Use extended passive mode - the FTP Server operates exactly the same as passive mode, however it only transmits the port number (not broken into high and low bytes) and Backup4all is to assume that it connects to the same IP address that was originally connected to. Use this option if the normal passive mode connection failed.
Use XCRC when testing (if available) - if the server supports the XCRC extension Backup4all can verify that files transferred to the server have been transmitted correctly using the CRC information received from the FTP server. This results in faster testing, as the files will not be downloaded to perform the CRC testing.
Resume upload/downloads (if available) - it resume the backup upload if the server supports resume command.
Limit file size to - specify the maximum file size you want to have. Larger files will be split. Please note that many FTP servers does not allow you to upload files larger than 2 GB.
Timeout - you can set the time interval (in seconds) that is allowed for no data transfer before the transfer operation is interrupted and must be resumed. Default is 30 seconds.
Firewall
Proxy type - select one of the options below (supported by your firewall) if you use a proxy to connect to the FTP:
- None - Sends the User name and optional Password for the FTP server as entered in the FTP window
- Send command USER - Sends the User name and optional Password defined in the proxy settings, followed immediately by the User name and optional Password for the FTP server.
- Send command SITE - Sends the User name and optional Password defined in the proxy settings, the SITE command with the Host value, and the User name and optional Password for the FTP site.
- Send command OPEN - Sends the User name and optional Password defined in the proxy settings, sends the OPEN command with the Host value, and the User name and optional Password for the FTP site.
- USER user@firewalluser@hostname / PASS pass@firewallpass - Sends the command USER user@proxyuser@host, then the command PASS pwd@proxypwd, or optionally PASS pwd.
- Transparent - Sends the User name and optional Password defined in the proxy settings, followed immediately by the FTP server User name and optional Password.
Host name or IP - In this field you have to enter the name or IP address for the proxy server (firewall).
Host port - Type the port number if different than the default port (80).
User name - This field is used to enter the proxy user name.
Password - In this field you can enter the password for the specified user name.


