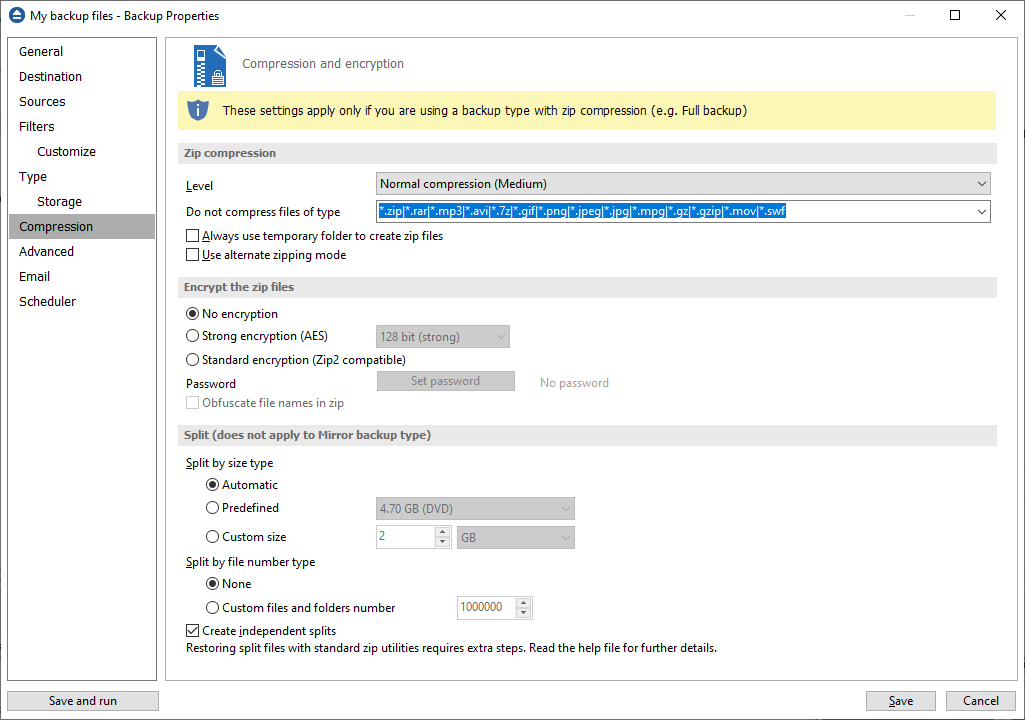
On the Compression page, you can configure the compression and encryption settings.

Zip compression
Level
You can set different compression levels for the backup:
- Zip without compression (Fastest) - files are just copied inside the zip archive, without any compression
- Low compression (Fast) - select this option if the size of the zip archive is not important, but the speed of the backup is
- Normal compression (Medium) - this is usually the best choice because it provides the optimum rate between zip archive size and the backup speed
- Best compression (Slow) - use this compression level to reduce the zip archive size as much as possible (the backup speed is reduced)
Use Zip without compression or Low compression if you backup large files to speed up the backup process. Use High compression when you want to create the smallest archive possible. This option takes more time if the files included in archive are large.
Do not compress files of type
The filter can be applied to increase the compression performance. It defines what types of files to be stored uncompressed in the zip file. These are files that are already compressed (e.g. zip, rar, mp3 or avi) and using the zip compression on them wouldn't result in a smaller sized backup. You can use the already defined file types or you can add others using the Default compression filter list in File->Options->Backup. The result will be that the backup will take less time when using compression.
Always use temporary folder to create zip files
If checked, the zip files are created in the temporary folder and then moved to the destination folder. This means that there should be enough free disk space on the drive where the temporary folder is located.
When backing up to removable media ( CD, DVD or Blu-ray disc, floppy, zip disk, etc.) this option is ignored, the zip files are always created in the temporary folder and then copied to the destination. When backing up to internal hard drives or LAN, you should uncheck this option to speed up the backup execution. By default this option is not checked.
Use alternate zipping mode
If not checked (default zipping mode), each file is compressed in blocks that are immediately added to the final zip file. If checked (alternate zipping mode), each file is compressed in blocks in a temporary file. When the whole file is compressed in the temporary file, it is added to the final zip file.
This option has effect only when backing up to internal hard drives and LAN. In all other cases this option is ignored. When backing up to LAN drives, it is recommended to check this option and uncheck Always use temporary folder to create zip files option. When backing up to internal hard drives, it is recommended to uncheck both options. By default this option is not checked.
Encrypt the zip files
No encryption
The zip files created are not protected by password for unauthorized access.
Strong encryption (AES)
This is the Advanced Encryption Standard, the best choice in zip protection, but recognized only by the latest version of third party zip applications.
Backup4all supports AES encryption in three different strengths:
- 128 bit (strong) - size of the encryption key is 128 bits. This provides significantly better security than standard zip 2.0 encryption.
- 192 bit (stronger) - size of the encryption key is 192 bits
- 256 bit (strongest) - size of the encryption key is 256 bits. This is the strongest encryption method for zip files and it provides the best security.
Standard encryption (Zip2 compatible)
This is the standard Zip 2.0 encryption: an older encryption technique that provides relatively weak security compared to AES encryption. Zip 2.0 encryption format cannot provide protection from individuals with access to specialized password recovery tools. Its advantage over AES encryption is the compatibility with all third party zip applications.
Set password
After you press this button, a windows with the following fields will appear:
- New password
Manually enter the password you want to use for your zip files in this field

- Confirm new password
Re-enter the password in this field to avoid typing errors.
- Old password
This field is enabled only when the backup job already has a password. You can change the password only if you enter the old one in this field. This way only the owner of the backup will be allowed to change the password.
The system makes it possible to set different passwords for the same backup job, so the backup may contain zip files with different passwords.
Obfuscate file names in zip
Using this option, all file names will be obfuscated and they will have in zip new names as numbers. This way you will get in destination a zip file with the source real names changed in order to get a higher protection. Normally, in zip file only the file content is protected, but anyone can see the name of the files. When the obfuscate option is used, even if the real names of the files in zip are replaced with numbers, you can still restore the files with the original names if the correct zip password is used.
Tips:
- when choosing a password, it is recommended that you use a combination of letters and numbers and at least 8 characters.
- make sure that you remember all passwords that have been used for a backup job, or you will not be able to restore your files.
Split (does not apply to Mirror backup type)
Split by size type
- Automatic
This is the default split option, meaning that the size of the zip is limited to the maximum file size allowed by the file system.
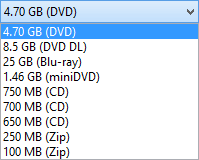
- Predefined
The predefined values are provided for floppy disks, zip disks and different CD media types.

- Custom size
Sometimes these predefined values are not enough. Therefore you can select Custom size in the combo and specify the maximum archive size you want. The minimum span size is 512 kilobytes. The value in the Size field means that each span should not exceed this value. However, because of the zip algorithm limitation, the system might create spans with size up to 32-64 kilobytes smaller than this value.
Split by file number type
- None - The split by file number option is disabled
- Custom files and folders number - Specify the maximum number of files and folders to be included in a zip file. This option is useful if the application is using a lot of computer memory
Create independent splits
Using this option, each backup split can be independently restored.
If you have a large backup that spans over several removable media (CD/DVD/Blu-ray, floppy) each spanned backup can be independently restored. Thus, if one of the spanned backup disks is corrupted you can still restore the other files.
Example: you have a backup that was spanned over 20 CDs, and you didn't leave the Create independent splits option checked. If you need to do a restore and one of the zip files is damaged, you lose all the data from the 20 CDs. Now, if the Create independent splits would have been checked, even if one zip file would have been damaged, the data from the other 19 could have been recovered.
Each zip file created with Backup4all can be extracted with standard zip utilities. However, when using the Create Independent Splits option and backing up a file big enough to be split into more than one zip file, you will need to perform an additional operation if you want to restore that file manually (without using Backup4all).
Here are the steps for restoring a split file from independent zip archives:
1. Unzip the archives that were created by Backup4all. Assuming that the initial file was called music.wav, if the file was split in 2 parts the problem is that both will have the same name, music.wav. Thus, when un-zipping the archive that contains the second part of the original music.wav, you'll get a message that a file with the same name already exist - you need to press Rename and name it music2.wav. Also, to make things easier, you need to rename the first part of the split file to music1.wav. The files you have renamed, music1.wav and music2.wav, need to be combined so that you have the entire original file, music.wav.
2. Open the Windows command prompt (Start->Run, type cmd and press Enter). Using the command copy (write copy/? and press Enter to see the help for this function) write copy music1.wav /b + music2.wav /b music.wav (first two files are the sources, last file is the destination) and press Enter. Note that you have to be in the folder where the source files are in order for it to work.


